You’ll need
- Thick corrugated cardboard (the cardboard from an old moving box works well)
- A cardboard box, like a shoebox or an empty box of office paper
- A collection of different sized round plastic lids and bottle caps with a small hole drilled through the centre of each (ask an adult to help make the holes)
- A hot-glue gun & an adult to assist you
- Push pins or split pins
- Scissors
- Coloured paper and markers for decoration.
What to do
- Cut the thick corrugated cardboard into long, thin strips. Make sure you cut across the bumps of the corrugations, not along them!
- Peel the paper off one side of the cardboard strips.
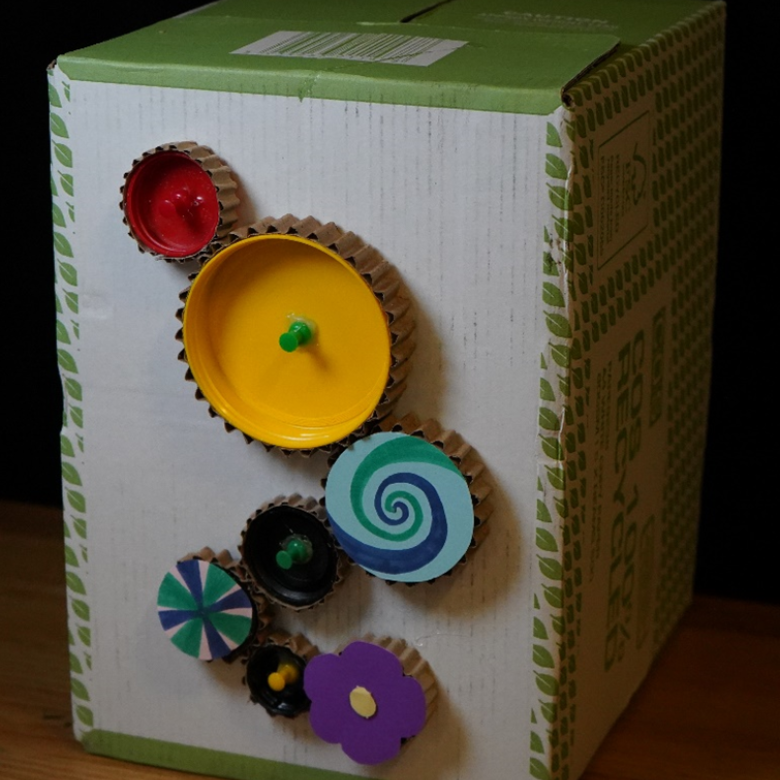
- Wrap a strip of cardboard around one of the lids so that the bumps are on the outside. Cut the strip to length and glue it around the lid with hot glue. These are your gears!
- Repeat step 3 with other lids and bottle caps to make different sized gears.
- Use a pushpin to attach a gear to the cardboard box through the hole in the middle of each lid and bottle cap.
- Attach a second gear so that it touches the first gear, with the cardboard ‘teeth’ interlocking.
- Decorate your gears with coloured paper and markers! What fun twirling shapes and patterns can you make?
Troubleshooting:
- A little bit of hot glue can help hold the pushpin in the middle of the gear if the hole is too big.
Questions to ask
- Connect two similarly sized gears and compare how they spin. What do you notice?
- Connect two differently sized gears and draw a dot or line on the edge of each. Start with the dots lined up, then spin the gears. How many turns does it take for the dots to line up again?
- Where have you seen or used gears before? On a push bike? Inside an old clock?
What’s happening
Gears are useful for changing the speed, force or direction in which something rotates.
The bumps around the edge of a gear are called teeth. When the teeth around the edge of one gear fit in between the teeth of another gear as they turn, we say they are ‘meshed’. Two meshed gears will always turn in the opposite direction to each other. When two or more gears are meshed, the gear that you push is called the drive gear. The gear at the other end of all the meshed gears is called the output gear.
When a big gear is meshed with a small gear, the big gear turns forcefully and slowly and the small gear turns easily and quickly. Depending on which you use as your drive gear and which as your output gear, you can use this to your advantage! For example, when you ride a bike, your pedals are attached to a large drive gear. The bike’s chain drives a smaller output gear that is attached to the back wheel. The bigger drive gear makes turning the pedals slightly harder, but it also makes the output gear and the back wheel turn faster. This is one reason why you can ride a bike further and faster than you could run. Many bikes have multiple gears. Usually, we use smaller drive gears (‘low gear’) while pedalling up hills, and larger drive gears (‘high gear’) while going fast or on flat surfaces.
Gears don’t always need to be round. Spiral-shaped ‘worm’ gears can change the angle that something is rotating, and long, straight rack gears can turn rotational motion into a side-to-side motion.
Did you know
Gears were the invention that allowed some of the earliest calculators to add and subtract numbers.
Explore more


